Monday, January 31, 2011

White Chocolate Grand Marnier Cake

First made for Chris' birthday, 29-Jan-2011, inspiration provided by Hunter1

For the story behind this cake adventure, check out It's all about flavour ... Yum!

White Chocolate Cake

Beat until fluffy  
  1 pkg (8 oz) cream cheese
  1 c sugar
Beat in  
  2 eggs
  1 tsp vanilla
Stir until blended  
  1 1/2 c all-purpose flour
  2 tsp baking powder
  1/2 c grated white chocolate

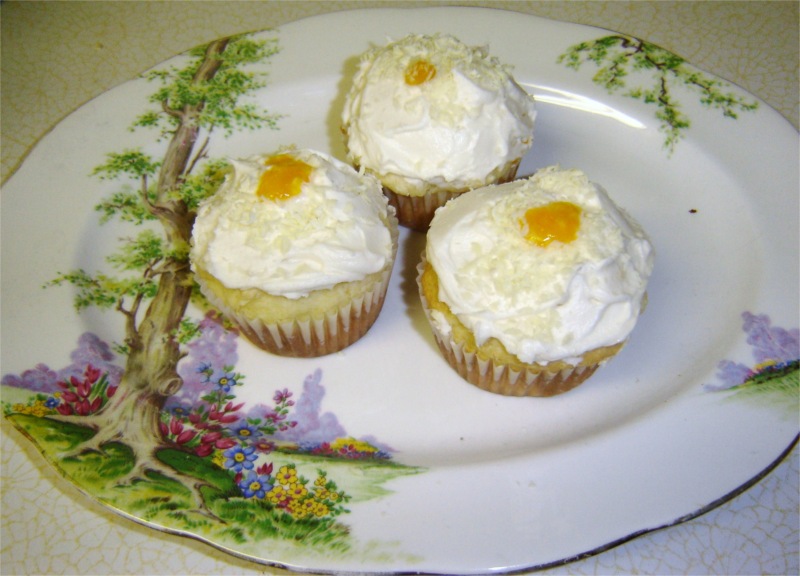
Bake at 350 F for approximately 45 minutes.  The top should be lightly golden and pick inserted in the centre should come out clean.  The bake time is approximate.  For the cake pictured in the "It's all about flavour" post, we made a double batch, filled 6 cupcakes and baked the rest of the batter in a 9 x 3 inch round pan.

Orange Mango Grand Marnier Filling

Combine in a saucepan  
  2 1/2 c mandarin orange segments
(3 small tins, packed in juice, drain and reserve juice)
  1/2 c frozen mango, medium diced
  3/4 c sugar
  3 tbsp cornstarch
  2 tbsp reserved juice
  1 tbsp Grand Marnier

Bring to a boil; boil for 2 minutes, stirring constantly.  Mixture will thicken.  Set aside to cool.

Grand Marnier Buttercream

Cream  
  1/2 c shortening
  1/2 c margarine
  1 tsp pure vanilla extract
Gradually add 4 c icing sugar
  2 tbsp milk
  1 tbsp Grand Marnier

Beat until fluffy.

To assemble cake:

Once cooled, slice cake in half and scoop out a thin layer from the centre of the top and bottom of the cake to allow extra filling without it spilling out.  For the cupcakes, I cut in to them like I was coring a tomato and then scooped out a bit of the bottom of the cupcake to give space for filling.

Add filling and replace the cake top.

Ice the cake with the Grand Marnier Buttercream.  If you want to ensure a clean circle of filling on top of the cake, you should probably pipe an outside ring.  I didn’t and there was a small issue with the filling running down the side of the frosting.

Distribute a thin layer of the filling in the centre of the frosted cake.  Sprinkle more grated white chocolate around the outside edge.  For the cupcakes, we sprinkled grated white chocolate on the icing and then added a tiny dollop of the filling to tie things all together.

Sunday, January 30, 2011

It’s all about the flavour … Yum!

Surprise birthday parties can be a lot of fun and this cake adventures included a great one.  Not only did we manage to pull off a perfect surprise without giving anything away, but my friend and I managed to come up with an amazing flavour combination for the birthday cake.

The idea started out knowing two things about the type of cake the birthday guy liked, white cake and jelly filling.  My friend who was throwing the party suggested we could make something with an orange, Grand Marnier filling.  I immediately thought of the White Chocolate cake recipe that has become one of my favourites and we were pretty sure we had a winning idea.

The end result was our White Chocolate Grand Marnier Cake.  We made our own orange filling with mandarin oranges, a little frozen mango and about a tablespoon of Grand Marnier.  We also substituted one tablespoon of Grand Marnier for some of the milk in the butter cream frosting.  With some of the filling spread on top of the icing and grated white chocolate around the edge, we had a lovely outside to go with the fabulous flavours inside.

Since our story to have time for baking was that we were trying out cupcake recipes that I might use for their wedding next spring, we made matching cupcakes.  I pretended I was coring a tomato and then scooped out a bit of the cupcake so there was extra space for the orange filling.  There were more of them but I forgot to take a picture until after we eaten the first round. =)
Because we had some extra time,  I  tried out a new recipe for Cookies ‘n’ Cream Cupcakes that I couldn’t resist.  The recipe was easy as could be and really just added some crushed Oreo cookies to a vanilla cupcake and the buttercream. While they might not be quite as pretty, the taste and texture was just right and they have a great chance of making the final cut for wedding cupcakes.

If you want to try it for yourself, you can find my recipe for the White Chocolate Grand Marnier Cake here.  It was yummy enough to deserve it’s own post for the recipe =)

Thursday, January 20, 2011

Lions, tigers, and bears, oh my!

As might be obvious from my recent cake adventures, there has been a lot of staff changes in the office where I work.  This month is no exception.  There are two more staff leaving at the end of the month.  With the cakes so far, I’ve managed to come up with something personalized for each one, but these two people are so different.  Their jobs in our office are really different, the jobs they’re going to are really different, and their personalities are also really different.  It was easy to come up with ideas for one of them, but I was completely stuck for the other.  I really didn’t want the cake to feel like the one was an afterthought so I went with something completely unrelated to either one.

Our office can be a bit of a zoo at times.  The workflow is always busy and the office is full of people with big personalities who like to have a lot of fun while they work hard.  It’s a good place to work but it can be a little crazy at times.  I got inspired by Wilton’s Silly Critters baking cups and decided to go with a zoo idea.  The thing was I didn’t want animals that large.  I thought about making fondant animals to stand on the cake, but decided I really only wanted animal faces. 

The challenge was how to make animal faces that I liked.  I looked online to find some generic cartoon animals that I could use as a pattern, but didn’t find any that seemed to be the right fit.  My options were getting limited and the time was passing on, so I decided to try drawing my own. My pencil drawing skills are really best for stick figures, so I made the animal face equivalent to give me at least the right shape to work with.

Some piping and a little painting with food colouring for some extra details and I had royal icing animal faces ready to go.  That sort of thing really should have more time to dry, so I left them overnight with a fan blowing on them, with my fingers crossed that they’d be dry enough to put on the cake in the morning without falling apart.  I couldn’t resist taking a picture of them still on their wax paper, just in case they didn’t make it.

Some careful use of an offset spatula while peeling the wax paper and the animals made it safely to the background of leaves and vines that I’d piped the night before.

Drawing with a pencil may not be my thing, but drawing with icing, that’s a lot more fun in my books!